Introduction
Water pressure reducing valves are essential for maintaining the integrity of plumbing systems in residential, commercial, and industrial settings. These valves reduce incoming water pressure from city mains to a manageable level, preventing potential damage to pipes and appliances. This guide provides a thorough overview of how to properly adjust and maintain water pressure reducing valves.
Understanding the Role of Water Pressure Reducing Valves
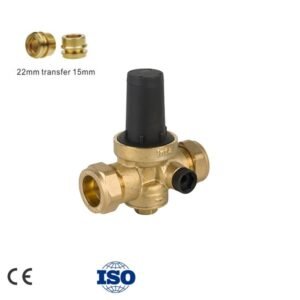
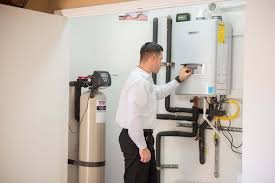
Water pressure reducing valves are designed to control excessive incoming water pressure from municipal water supplies. Located typically near the main water entrance, these valves are critical for preventing issues such as pipe bursts and leakages in your plumbing system.
Why Adjustment Is Necessary
Adjusting your water pressure reducing valve is crucial under certain conditions, such as noticeable fluctuations in water pressure, changes in the plumbing system, or after installing new fixtures that require specific pressure levels. Indicators that adjustments may be needed include:
- Symptoms of high water pressure like noisy or vibrating pipes.
- Low water pressure affecting fixture performance.
- Updates or changes to your home’s plumbing system.
Step-by-Step Guide to Adjusting Your Valve
Adjusting a water pressure reducing valve involves careful steps to ensure effectiveness and safety:
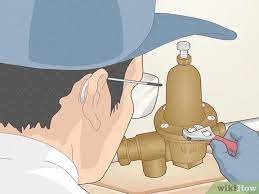
- Identify the Valve Location: Locate the valve within your plumbing system; it’s usually near where the main water line enters your home.
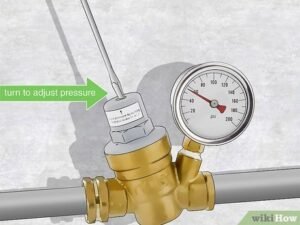
- Measure Current Pressure: Use a pressure gauge to record the existing pressure for reference before making any adjustments.
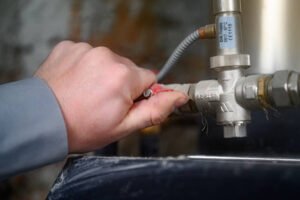
- Relieve System Pressure: Open a faucet after the valve to release any built-up pressure in the system.
- Adjustment: Turn the set screw on the valve with a wrench. Increase the pressure by turning the screw clockwise, and decrease it by turning it counterclockwise.
- Check and Re-adjust: Observe the pressure changes using the gauge and adjust accordingly to reach the desired pressure level, usually between 45-60 psi.
- Test the Adjustment: Open multiple water fixtures to check for consistent water flow and re-measure the pressure to ensure it remains within the safe range. Make further adjustments if necessary.
Maintaining Your Valve
To extend the life and functionality of your water pressure reducing valve, consider these maintenance tips:
- Regular Checks: Inspect your valve and associated plumbing annually for any signs of deterioration or leakage.
- Clean Regularly: In areas with hard water, clean the valve periodically to prevent mineral build-up.
- Consider Valve Replacement: Depending on environmental conditions and usage, replace the pressure reducing valve every 10-15 years.
Additional Considerations
For those using specific brands like Heape or Watts, it’s important to follow any model-specific instructions provided by the manufacturer for adjustments【14†source】【16†source】. Installing pressure gauges downstream can also aid in more precise adjustments across the system. If uncertain, or for major adjustments, seeking professional plumbing advice is recommended.
Conclusion
Proper adjustment and maintenance of your water pressure reducing valve are critical to safeguarding your plumbing system. By following these detailed steps, you can ensure optimal performance and prevent common issues associated with high or low water pressures. Regular maintenance and timely adjustments will keep your system running smoothly and efficiently.
Comprehensive Guide to Adjusting a Water Pressure Reducing Valve
Introduction
Water pressure reducing valves are essential for maintaining the integrity of plumbing systems in residential, commercial, and industrial settings. These valves reduce incoming water pressure from city mains to a manageable level, preventing potential damage to pipes and appliances. This guide provides a thorough overview of how to properly adjust and maintain water pressure reducing valves.
Understanding the Role of Water Pressure Reducing Valves
Water pressure reducing valves are designed to control excessive incoming water pressure from municipal water supplies. Located typically near the main water entrance, these valves are critical for preventing issues such as pipe bursts and leakages in your plumbing system.
Why Adjustment Is Necessary
Adjusting your water pressure reducing valve is crucial under certain conditions, such as noticeable fluctuations in water pressure, changes in the plumbing system, or after installing new fixtures that require specific pressure levels. Indicators that adjustments may be needed include:
- Symptoms of high water pressure like noisy or vibrating pipes.
- Low water pressure affecting fixture performance.
- Updates or changes to your home’s plumbing system.
Step-by-Step Guide to Adjusting Your Valve
Adjusting a water pressure reducing valve involves careful steps to ensure effectiveness and safety:
- Identify the Valve Location: Locate the valve within your plumbing system; it’s usually near where the main water line enters your home.
- Measure Current Pressure: Use a pressure gauge to record the existing pressure for reference before making any adjustments.
- Relieve System Pressure: Open a faucet after the valve to release any built-up pressure in the system.
- Adjustment: Turn the set screw on the valve with a wrench. Increase the pressure by turning the screw clockwise, and decrease it by turning it counterclockwise.
- Check and Re-adjust: Observe the pressure changes using the gauge and adjust accordingly to reach the desired pressure level, usually between 45-60 psi.
- Test the Adjustment: Open multiple water fixtures to check for consistent water flow and re-measure the pressure to ensure it remains within the safe range. Make further adjustments if necessary.
Maintaining Your Valve
To extend the life and functionality of your water pressure reducing valve, consider these maintenance tips:
- Regular Checks: Inspect your valve and associated plumbing annually for any signs of deterioration or leakage.
- Clean Regularly: In areas with hard water, clean the valve periodically to prevent mineral build-up.
- Consider Valve Replacement: Depending on environmental conditions and usage, replace the pressure reducing valve every 10-15 years.
Additional Considerations
For those using specific brands like Heape or Watts, it’s important to follow any model-specific instructions provided by the manufacturer for adjustments【14†source】【16†source】. Installing pressure gauges downstream can also aid in more precise adjustments across the system. If uncertain, or for major adjustments, seeking professional plumbing advice is recommended.
Conclusion
Proper adjustment and maintenance of your water pressure reducing valve are critical to safeguarding your plumbing system. By following these detailed steps, you can ensure optimal performance and prevent common issues associated with high or low water pressures. Regular maintenance and timely adjustments will keep your system running smoothly and efficiently.